Tuesday, September 13, 2016

Christmas Wood Pieces ...

Every year I found we were always searching for ways to display the Christmas cards and Christmas pictures received by friends and family - we would use ribbon and hang them in front hallway or ribbon across the mantle place or bookshelves would hold some, at times we had so many cards that our front door way was lined with them and of course being that you are always bundled up that time of year - eventually some would find their way to the floor being knocked off as you would take off your coat - ha ha frustrating.

Looking on "Pinterest" one day I was searching up different ways to display Christmas cards and came across a beautiful wood project that looked like something we could easily build - well in honesty that Kevin could build and I could finish ha ha. Along with that I found an idea for a beautiful Christmas wood sign for the mantle and asked him to make me the base of this as well.  

The base of the card holder - hangers on back and stained
 First a simple 10 x 1" board - stained with a walnut ink - and he put heavy duty picture hangers on the back to hang on the existing nails in the wall (other projects there the rest of the year).
 The base of the Wood sign was also stained in a walnut ink - 10 X 1" boards used with a 1 x2" cross brace twice on the back side. 

Painted up some simple wood cloths pins and got my glue gun ready.  For the wording on the Christmas card holder I had some stick and peel vinyl that I ran through my cricut machine to cut out the letters. It was a bit finicky to pull the vinyl and place the letters smoothly but with a little swearing (have to be honest) and a whole lot of patience letter by letter all down, love the look.  Could have also painted letters on - would have worked well also.
Finished piece - Christmas Card Holder


The finished piece looks awesome and love having the cards all in one place and organized - last Christmas we did not get many cards (as I was neglectful in sending any) so I fill the blanks with pictures of family and friends and loved the warm look in the front hallway.

The Christmas wood sign - I just used a white china pencil to write the words on the piece.  I was not sure if I was going to keep the sign with those words on it so I wanted to be able to erase them if I want to change my mind.  Paint would definitely make the words pop - but the pictures do not do justice to how lovely this piece is on my mantle. Kevin also made a little wedge piece that the piece sits on so I did not have to think about how to hang it.  

Love the look - I am a woodsy sort of gal so I love the look of wood in my home, and love that warm walnut stain.  

Friday, September 9, 2016

Decorative Painted Fence Pieces - Pinterest Inspired

I wanted to add a little pizzaz to the back of my gardens - something that was more stable and I did not have to wait to grow in height, a decorative piece versus a plant or flower.  I had seen some cute styles of decorative fence pieces on Pinterest and asked my guy if he could build me a couple styles - with the option of sturdy stakes so I could firmly put them in the back of my garden.  

My guy Kevin is a wonder - he is the "if I can show him he can built it" wood guy - I love when I see something (on Pinterest usually or even at one of the greenhouses) and say "oh I love that - do you think we could do something like that" that he figures it out. 
My awesome wishing well (needs to be stained) that we saw something similar at the greenhouse and he built me this! 

I do however have more than one wood project that Kevin has done his part but I have yet to finish mine - but I don't mind as then when it strikes me to get it out and finish I am only waiting on myself ha ha ~ not for him to design and build it.  ;) 

So asked him to build me some sturdy fence pieces - 

 I wanted two different designs to see which one I enjoyed painting up more - I decided to do the more intricate one first and then that also changed my plan for the second one (which I am not done yet - though I could put out as is - I want to add a bit more.)


I found that I loved the first one more with the more intricate birdhouses - and added bee hives on it - took longer to do of course and as the season was late when finished they never got into the gardens this summer ha ha.
Instead they are in my nook where my pantries sit (and wait to be painted as well) and I love them. 

Brings that little bit of garden look I love into my kitchen nook area, and they sit nicely on top of the counters.

This one not finished yet
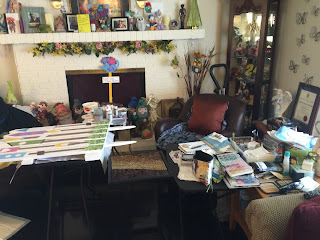
My painting station in our living room ha ha - a bit awkward - next on the list a big easel ha ha ;)
I found working on my set up in my living room a bit hard on my back at times - as kind of slightly stooped for long periods of time. Already I have my guy thinking of a way to build me a sturdy easel that I could use for the fences but also work for any size canvas I may want to work on ... so that one is also on the list and I know eventually we will find the perfect plan. ;) 


Love having a handy man and also one that loves me so does not get frustrated when I ask him for endless wood projects to start ha ha. 

Thursday, September 8, 2016

Painting Rocks ... for the garden

I find it has been an interesting year this year in my creative going-ons - I seem to not be as settled as last year and jumping from project to project - starting new ones before others are finished, and doing a project that maybe caught my eye a while ago but all of a sudden I decide to jump in and do it - painted rocks were just like that.

The painted rock idea I have always loved - looked at dozens of pictures on Pinterest - I love love love Pinterest - I am a visual learner and motivation comes to me through my eyes ... versus some who may be motivated by words, or sounds - I pull from all I see.  Anyway a lot of what I start painting comes from similar projects that I find out on the internet a lot on Pinterest.  I would never claim that these are completely my own design ... you learn by imitating others until you start putting things together on your own.  Some say that there is no real completely "original" art and I find that to be a very interesting thought - yet I think by learning and then forming our own style as we bring in what we have learned from others we form our own "piece" of art.  I can say though my teachers I am sure learned different processes from others - they have a distinct style that a lot of them I can pick out something either inspired by them or something made by them. :) It is very cool and all very lovely.

Back to my painted rocks:  these are just a few I have done - totally inspired by pictures on Pinterest and look so darling in my home and garden - and fun and easy to do also! 


Just using a reg smooth garden rock - well washed and dried.

Inexpensive outdoor acrylic paint used and then spray coat of finisher when done - holding up well.


Love the look of these inside and out of the house, so far they are wearing well (those outside) and we shall see once we pull them in this fall how well the inexpensive outdoor paint held up.  Fun easy project.

More painting nites ... Edmonton Paint Nite

Attended a couple more Paint Nites
with my sister Belinda - the second event we took our guys along with us - had a little lunch first at the venue Fionn MacCool's - and then did a bit of painting - both events were awesome.  The only thing I found going with our guys is that though it was fun painting the same picture with them - then we both had double the same picture!  LMAO - I think the next one I will try with my guy Kevin if he is up for it is the partner painting - where you both paint a half of a whole so you have two frames you can hang together and it is one picture - that is so cool.  :)

Just a few pictures of our fun Paint Nite events out! :)


I think we both did pretty well with this one - I did not even want to go home and fix it like last time ha ha.


All set up in our cozy corner ready to get down to business!

My painter man :)


Working hard


We did AWESOME! :)


Fun nights and an inexpensive date with using the coupon codes to sign up - or could use a group on too.  We enjoy doing something a little different when going out and it was fun to share the creative side with our guys and learn new skills in the process.